Validations
The Validation process
The first time a user logins to the service he is recognised as an "Identified User" , a user with an id that is assigned to him by the Authentication Service. The only data that the service keeps is the unique id. As an "Identified User" the user can only view the public assessments. No other actions are allowed . In order to start getting permissions and creating assessments is to be a "Validated User" .
A Validated User is someone who contributes to external evaluations, assessments, and potentially self-assessments. These users receive additional guidance and best practices to support the assessment process.
- PID
- AARC
To become a Validated User, the user must update his profile and submit a Validation Request, specifying their role and organization. Validation is always tied to a specific role and organization, ensuring that the user is recognized as a relevant actor within the service.
The Validation Request serves as the first step in initiating the process of an assessment. Since this request requires approval, an admin reviews the submission and makes a decision to either accept or reject it. If approved, access is granted to the user ; if rejected, access is not granted. Regardless of the decision, the user is notified via email about the outcome.
To become a Validated User, the user must have his profile updated in order to submit a Validation Request, specifying their role and provider.
Note: When a user logs in through their identity provider, their profile information is automatically filled in using the data received during login. Manual updates are only needed if some required details (like name or email) are missing.
Validation is always tied to a specific role and provider, ensuring that the user is recognized as a relevant actor within the service.
The Validation Request serves as the first step in initiating the process of an assessment. Since this request requires approval, an admin reviews the submission and makes a decision to either accept or reject it. If approved, access is granted to the user ; if rejected, access is not granted. Regardless of the decision, the user is notified via email about the outcome.
Manage Validations
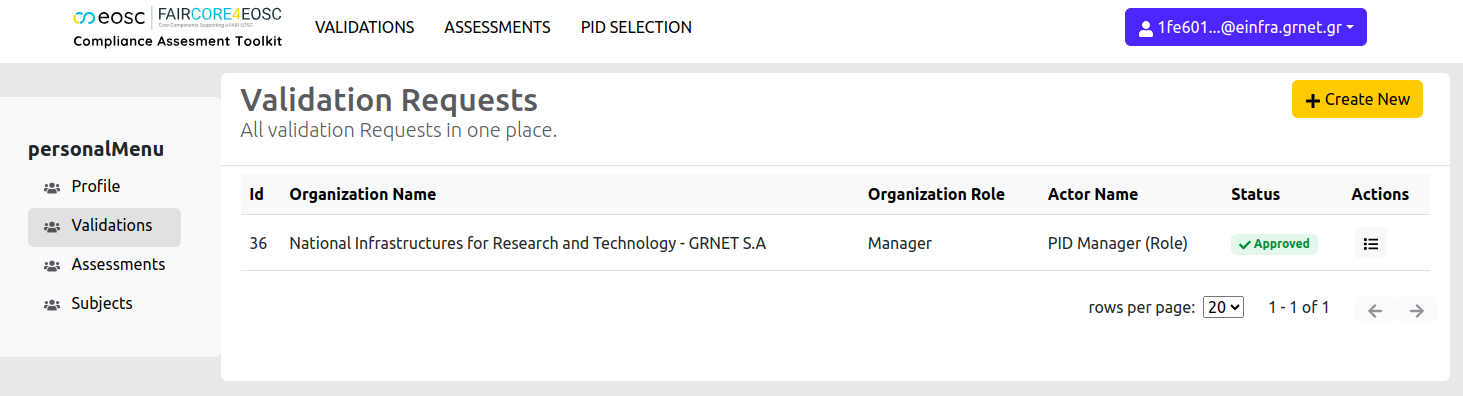
To manage validations, users should navigate to the Validations tab from the Personal Menu located on the left sidebar.
- PID
- AARC

Viewing Validations
Upon entering the Validations tab, users can view a comprehensive list of validations associated with their account. The following information is displayed for each validation request:
- PID
- AARC
- Validation ID: A unique identifier for the validation.
- Organisation Name: The name of the organisation for which the validation is being processed.
- Actor Name: The name of the individual associated with the validation.
- User Role: The role of the user within the organisation.
- Validation Status: The current status of the validation request. Possible statuses include:
- Approved
- Pending Review
- Rejected
- Validation ID: A unique identifier for the validation.
- Service Name: The name of the service for which the validation is being processed.
- Assessment Actor: The name of the individual associated with the validation.For AARC there is one assessment actor: AAI Service Provider
- User Role: The role of the user within the organisation.
- Validation Status: The current status of the validation request. Possible statuses include:
- Approved
- Pending Review
- Rejected
To view more details about a specific validation request, users can click the Details button ![]() next to the validation. This will redirect them to a detailed page where further information about the validation is provided.
next to the validation. This will redirect them to a detailed page where further information about the validation is provided.
Creating a New Validation
To create a new validation request, users should click the Create New button, which will redirect them to the validation creation page. On the validation creation page, users will need to provide the following information:
- PID
- AARC
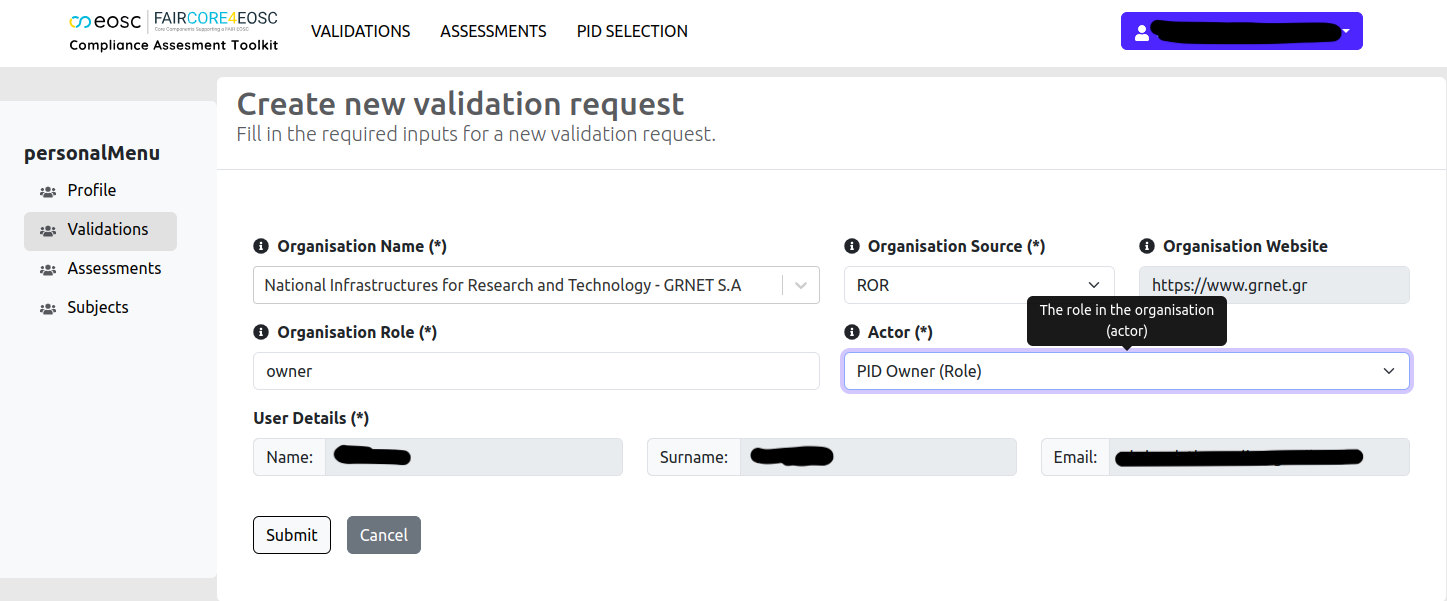
- Organisation Name: Choose the organisation on behalf of which the validation is being made. This is an autocomplete list from the ROR organization.
- If you find your Organization's name in the list then the fields Organisation Source and Organisation Website are automatically filled in. The Organisation Source will take the value of "ROR" and the Organisation Website of your ORganization.
- If your Organization Name is not part of the ROR, then in the Organisation Source select the custom field . By the time you select the custom field, then you must mannually fill in the Value of the Organization Name and the Organization Website.
- User Role: Specify the user's role within the chosen organisation.
- Actor Role: Specify the actor for the validation. There is a predefined list of actor based on the CAT instance. For the PID Instance the type of actors are selected from the EOSC PID Policy . The list of actors are
- PID Scheme (Component)
- PID Authority (Role)
- End User (Role)
- Compliance Monitoring (Role)
- Multi-Primary Administrator (MPA)(Role)
- PID Owner (Role)
- PID Manager (Role)
- PID Service Provider (Role)
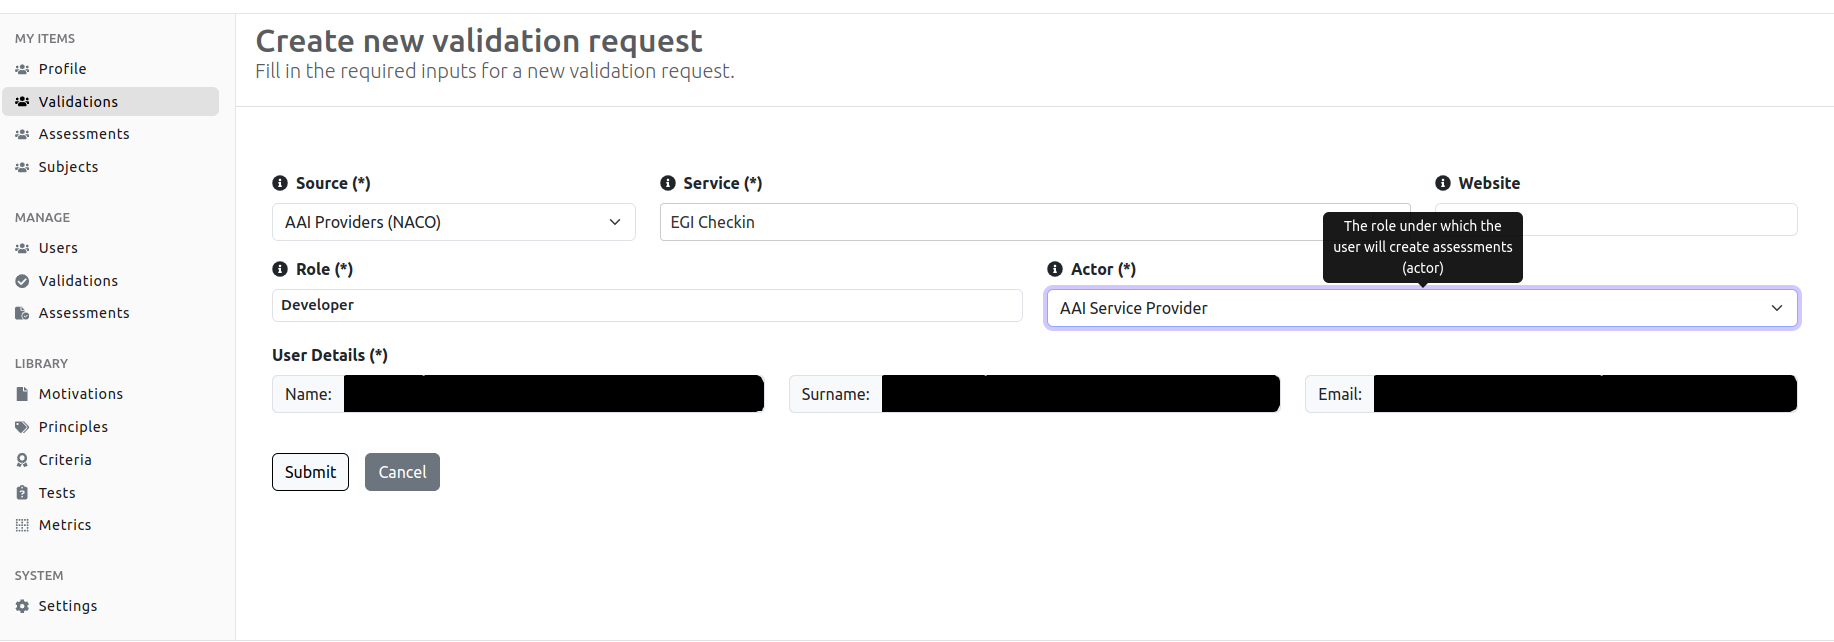
- Service: The Source will take the value of "AAI Providers (NACO)" in the drop-down menu. Choose the service for which the validation is being made. This is an autocomplete list from the AAI Providers (NACO).
- If you find your Service's name in the list then the fields Service are automatically filled in.
- If your Service Name is not part of the AAI Providers (NACO), then in the Source select the custom field. By the time you select the custom field, then you must mannually fill in the Value of the Providers Name.
- Website : Once the service is found and selected or filled in, you can optionally fill the Website of the service.
- User Role: Specify the user's role to request a validation.
- Actor Role: Specify the actor for the validation.For AARC instance there is one actor:
- AAI Service Provider (Role)
These are the required fields . At the same time the User Details are pre-filled by the data the user added in the profile page.
Once the necessary fields are filled in, users can click the Submit button to create the validation request. If they wish to cancel the process, they can click the Cancel button.
Upon submission, the validation request will be placed in a Pending Review status. A notification email will be sent to the administrators to inform them of the new validation request. Additionally, an email will be sent to the user confirming that their validation request has been successfully received and is currently under review. As already mentioned, if the request is approved, access is granted to the user ; if rejected, access is not granted. Regardless of the decision, the user is notified via email about the outcome.